mito’s blog

IT技術メインの雑記。思い立ったが吉日。

[AWX] Ubuntuにk3sとawx-operatorでAWXを構築する(更新2023.03.28)

はじめに

AWXバージョン21をk3s上にawx-operatorで構築します。
構築手順は、整理したらそんなに複雑ではなかったです。また、Githubにはminikubeを例にした構築手順が載っていますが、k3sは軽いというし触ってみたかったので。

GitHub - ansible/awx-operator: An Ansible AWX operator for Kubernetes built with Operator SDK and Ansible. 🤖


更新2023.03.28

いくつかワーニングが出ますが、以下の環境(latest)でも同じ手順で構築できました。

環境
  • AWX: 21.14(latest)
  • OS: Ubuntu 22.04
    • Keyのタイプはed25519で作成してください。
    • インスタンスタイプ: t3.medium
    • 容量: 30GB
    • セキュリティグループ: sshとポート30080をあけます。
  • k3s: v1.25.7(latest)
  • kustomize: v5.0.1(latest)
  • awx-operator: 1.4.0


環境

EC2に構築します。

  • AWX: 21.4
  • OS: Ubuntu 22.04
    • Keyのタイプはed25519で作成してください。
    • インスタンスタイプ: t3.medium
    • 容量: 30GB
    • セキュリティグループ: sshとポート30080をあけます。
  • k3s: v1.24.3
  • kustomize: v4.5.7
  • awx-operator: 0.26.0


Ubuntuのパッケージアップデート

パッケージを最新に上げます。

$ sudo apt update
$ sudo apt upgrade -y
$ sudo reboot
# OKを押す


k3sのインストール

1行でインストールできます。
インストール後、サービスが起動完了するまで少々待ちます。

$ sudo curl -sfL https://get.k3s.io | sh -s - --write-kubeconfig-mode 644
[INFO]  Finding release for channel stable
[INFO]  Using v1.24.3+k3s1 as release
[INFO]  Downloading hash https://github.com/k3s-io/k3s/releases/download/v1.24.3+k3s1/sha256sum-amd64.txt
[INFO]  Downloading binary https://github.com/k3s-io/k3s/releases/download/v1.24.3+k3s1/k3s
[INFO]  Verifying binary download
[INFO]  Installing k3s to /usr/local/bin/k3s
[INFO]  Skipping installation of SELinux RPM
[INFO]  Creating /usr/local/bin/kubectl symlink to k3s
[INFO]  Creating /usr/local/bin/crictl symlink to k3s
[INFO]  Creating /usr/local/bin/ctr symlink to k3s
[INFO]  Creating killall script /usr/local/bin/k3s-killall.sh
[INFO]  Creating uninstall script /usr/local/bin/k3s-uninstall.sh
[INFO]  env: Creating environment file /etc/systemd/system/k3s.service.env
[INFO]  systemd: Creating service file /etc/systemd/system/k3s.service
[INFO]  systemd: Enabling k3s unit
Created symlink /etc/systemd/system/multi-user.target.wants/k3s.service → /etc/systemd/system/k3s.service.
[INFO]  systemd: Starting k3s


オプションについて

  • --write-kubeconfig-mode 644

エラーメッセージ

error: error loading config file "/etc/rancher/k3s/k3s.yaml": open /etc/rancher/k3s/k3s.yaml: permission denied


Kustomizeのインストールとマニフェストの適用

Kustomizeは、マニフェスト管理ツールです(今回初めて触りました)。
Kustomizeをインストールし、マニフェストを作成・適用します。
マニフェストには、awx-operatorのバージョンを指定します。

$ sudo curl -s "https://raw.githubusercontent.com/kubernetes-sigs/kustomize/master/hack/install_kustomize.sh"  | bash
{Version:kustomize/v4.5.7 GitCommit:56d82a8378dfc8dc3b3b1085e5a6e67b82966bd7 BuildDate:2022-08-02T16:35:54Z GoOs:linux GoArch:amd64}
kustomize installed to /home/ubuntu/kustomize
$ 
$ 
$ vi kustomization.yaml
apiVersion: kustomize.config.k8s.io/v1beta1
kind: Kustomization
resources:
  # Find the latest tag here: https://github.com/ansible/awx-operator/releases
  - github.com/ansible/awx-operator/config/default?ref=0.26.0        # 任意のバージョンを指定

# Set the image tags to match the git version from above
images:
  - name: quay.io/ansible/awx-operator
    newTag: 0.26.0        # 任意のバージョンを指定

# Specify a custom namespace in which to install AWX
namespace: awx
$ 
$ 
$ sudo ./kustomize build . | kubectl apply -f -
namespace/awx created
customresourcedefinition.apiextensions.k8s.io/awxbackups.awx.ansible.com created
customresourcedefinition.apiextensions.k8s.io/awxrestores.awx.ansible.com created
customresourcedefinition.apiextensions.k8s.io/awxs.awx.ansible.com created
serviceaccount/awx-operator-controller-manager created
role.rbac.authorization.k8s.io/awx-operator-awx-manager-role created
role.rbac.authorization.k8s.io/awx-operator-leader-election-role created
clusterrole.rbac.authorization.k8s.io/awx-operator-metrics-reader created
clusterrole.rbac.authorization.k8s.io/awx-operator-proxy-role created
rolebinding.rbac.authorization.k8s.io/awx-operator-awx-manager-rolebinding created
rolebinding.rbac.authorization.k8s.io/awx-operator-leader-election-rolebinding created
clusterrolebinding.rbac.authorization.k8s.io/awx-operator-proxy-rolebinding created
configmap/awx-operator-awx-manager-config created
service/awx-operator-controller-manager-metrics-service created
deployment.apps/awx-operator-controller-manager created
$ 
$ 
$ kubectl get pods -n awx
NAME                                               READY   STATUS    RESTARTS   AGE
awx-operator-controller-manager-7f89bd5797-89w7b   2/2     Running   0          4m5s


AWXのインストール(マニフェストの追加)

AWXをデプロイするawx-demo.yamlの作成と、kustomization.yamlのresourcesにawx-demo.yamlを追加します。
awx-demo.yamlのportは適宜変更してください。

  • AWXをデプロイするawx-demo.yamlの作成
$ vi awx-demo.yaml
---
apiVersion: awx.ansible.com/v1beta1
kind: AWX
metadata:
  name: awx-demo
spec:
  service_type: nodeport
  # default nodeport_port is 30080
  nodeport_port: 30080


  • kustomization.yamlのresourcesにawx-demo.yamlを追加
$ vi kustomization.yaml
apiVersion: kustomize.config.k8s.io/v1beta1
kind: Kustomization
resources:
  # Find the latest tag here: https://github.com/ansible/awx-operator/releases
  - github.com/ansible/awx-operator/config/default?ref=0.26.0
  - awx-demo.yaml                     # この行を追加

# Set the image tags to match the git version from above
images:
  - name: quay.io/ansible/awx-operator
    newTag: 0.26.0

# Specify a custom namespace in which to install AWX
namespace: awx


  • マニュフェストの適用
$ sudo ./kustomize build . | kubectl apply -f -
namespace/awx unchanged
customresourcedefinition.apiextensions.k8s.io/awxbackups.awx.ansible.com unchanged
customresourcedefinition.apiextensions.k8s.io/awxrestores.awx.ansible.com unchanged
customresourcedefinition.apiextensions.k8s.io/awxs.awx.ansible.com unchanged
serviceaccount/awx-operator-controller-manager unchanged
role.rbac.authorization.k8s.io/awx-operator-awx-manager-role configured
role.rbac.authorization.k8s.io/awx-operator-leader-election-role unchanged
clusterrole.rbac.authorization.k8s.io/awx-operator-metrics-reader unchanged
clusterrole.rbac.authorization.k8s.io/awx-operator-proxy-role unchanged
rolebinding.rbac.authorization.k8s.io/awx-operator-awx-manager-rolebinding unchanged
rolebinding.rbac.authorization.k8s.io/awx-operator-leader-election-rolebinding unchanged
clusterrolebinding.rbac.authorization.k8s.io/awx-operator-proxy-rolebinding unchanged
configmap/awx-operator-awx-manager-config unchanged
service/awx-operator-controller-manager-metrics-service unchanged
deployment.apps/awx-operator-controller-manager configured
awx.awx.ansible.com/awx-demo created


  • AWXの構築

ログを確認しながら、インストール完了まで待ちます。

$ kubectl logs -f deployments/awx-operator-controller-manager -c awx-manager -n awx
()
--------------------------- Ansible Task StdOut -------------------------------

 TASK [Remove ownerReferences reference] ********************************
ok: [localhost] => (item=None) => {"censored": "the output has been hidden due to the fact that 'no_log: true' was specified for this result", "changed": false}

-------------------------------------------------------------------------------
{"level":"info","ts":1662367322.9867978,"logger":"runner","msg":"Ansible-runner exited successfully","job":"3826332412612488260","name":"awx-demo","namespace":"awx"}

----- Ansible Task Status Event StdOut (awx.ansible.com/v1beta1, Kind=AWX, awx-demo/awx) -----


PLAY RECAP *********************************************************************
localhost                  : ok=69   changed=0    unreachable=0    failed=0    skipped=50   rescued=0    ignored=0

----------
Ctrl+cで抜けます


awx-demoのステータスがRunningになったら、portとadminパスワードを確認します。

$ kubectl get pods -l "app.kubernetes.io/managed-by=awx-operator" -n awx
NAME                        READY   STATUS    RESTARTS   AGE
awx-demo-postgres-13-0      1/1     Running   0          3m25s
awx-demo-858b46b795-rqj2j   4/4     Running   0          2m54s
$ 
$ 
$  kubectl get svc -l "app.kubernetes.io/managed-by=awx-operator" -n awx
NAME                   TYPE        CLUSTER-IP     EXTERNAL-IP   PORT(S)        AGE
awx-demo-postgres-13   ClusterIP   None           <none>        5432/TCP       9m52s
awx-demo-service       NodePort    10.43.66.172   <none>        80:30080/TCP   9m23s # ポートの確認
$ 
$ 
$ kubectl get secret awx-demo-admin-password -o jsonpath="{.data.password}" -n awx | base64 --decode
qJcokXXXXXXXXXXXXX    # パスワードの確認


AWXにアクセス

AWXにブラウザで接続します。

  • URL: http://IPアドレス:30080
  • ユーザ名: admin
  • パスワード: 上記コマンドで確認したパスワード

無事アクセスでき、DEMOジョブテンプレートも動きました。


その他

UIもそうだけど、ワークフローテンプレートが作り方が結構変わっていて興味深い。
トポロジーは小規模ならそこまで気にしなくていいのかな?コントローラーと実行ノードが分かれているだけで、この辺りは使いやすそう。


参考

大変助かりました!

[Backlog] [GoogleAppsScript] 本日が期限日の課題を直接Slackに通知する

はじめに

本日が期限日の課題をGoogleAppsScript(以下、GAS)で直接Slackに通知します。
前回の記事ではBacklogのインテグレーションを利用していましたが、今回はGASのみで実装します。


Slackの設定

以下を参考にしてください。
手順5で表示される Incoming Webhook URL をコードに記載します。

Slack での Incoming Webhook の利用 | Slack


サンプルコード

サブドメインやプロジェクトIDは、Backlogを開いたURLに含まれています。
検索する課題のステータスは、デフォルトとします。

function func_backlog() {
  // 課題一覧を取得するためのパラメータ
  let parameter_get = {
    "method" : "GET",
    "contentType": "application/json",
  };

  // 本日の日付を取得する
  var today = Utilities.formatDate(new Date(), "JST","yyyy-MM-dd")

  // 取得したい課題の検索条件をURLの後に記載する
  let issues_url = "https://【サブドメイン】.backlog.com/api/v2/issues?apiKey=【API Key】&projectId[]=【プロジェクトID】&statusId[]=1&statusId[]=2&statusId[]=3&dueDateSince=" + today + "&dueDateUntil=" + today;

  // 課題一覧を取得する
  let rslt = UrlFetchApp.fetch(issues_url, parameter_get);

  // JSONにパースする
  let json_rslt = JSON.parse(rslt);

  // 複数の課題に対応
  for (let i = 0; i < json_rslt.length ; i++) { 

    // 通知内容。任意のメッセージに変更してください
    const data = { "text": "期限日は" + today + "です\n" +
                           "タイトル:" + json_rslt[i]["summary"] + "\n" + 
                           "URL:https://【サブドメイン】.backlog.com/view/" + json_rslt[i]["issueKey"]
    }

    // Slackに通知するパラメータ
    const parameter_post = {
      "method": "post",
      "Content-type": "application/json",
      "payload": JSON.stringify(data)
    }

    slack_url = "【SlackのIncoming Webhook URL】";

    // Slackに通知する。rsltは無くてもいい
    rslt = UrlFetchApp.fetch(slack_url, parameter_post);

    // ログ出力用。無くてもいい
    console.log("期限日 " + today + " のタスク: " + json_rslt[i]["issueKey"]);
  }
}


課題の検索条件などは、以下を参考にしてください。

[Backlog] [GoogleAppsScript] 本日が期限日だけど完了していない課題をSlackやTeamsに通知する - mito’s blog


その他

Slackのワークフローでも実装できるけど、手間は変わらなさそう。
GAS楽しい。

[Backlog] [GoogleAppsScript] 本日が期限日だけど完了していない課題をSlackやTeamsに通知する

はじめに

Backlogのインテグレーションでは、本日が期限日だけど完了していない課題を通知出来ません。そのため、GoogleAppsScriptで課題にコメントを登録するコードを作成し、Backlogのインテグレーションで通知できるようにしました。
GoogleAppsScriptを選んだ理由は、触ってみたかったのとトリガーの定時実行があるからです。


サンプルコード

サブドメインやプロジェクトIDは、Backlogを開いたURLに含まれています。
検索する課題のステータスのIDはデフォルトとし、完了していない課題は未処理・処理中・処理済みとしています


function func_backlog() {
  // 課題一覧を取得するためのパラメータ
  let parameter_get = {
    "method" : "GET",
    "contentType": "application/json",
  };

  // 本日の日付を取得する
  let today = Utilities.formatDate(new Date(), "JST","yyyy-MM-dd")

  // 取得したい課題の検索条件をURLの後に記載する
  let issues_url = "https://【サブドメイン】.backlog.com/api/v2/issues?apiKey=【API Key】&projectId[]=【プロジェクトID】&statusId[]=1&statusId[]=2&statusId[]=3&dueDateSince=" + today + "&dueDateUntil=" + today;

  // 課題一覧を取得する
  let rslt = UrlFetchApp.fetch(issues_url, parameter_get);

  // JSONにパースする
  let json_rslt = JSON.parse(rslt);

  // 課題にコメントを登録するパラメータ
  let parameter_post = {
    "method": "POST",
    "contentType": "application/x-www-form-urlencoded",
    "payload" : {
      // 任意のメッセージに変更してください
      "content" : "本日が期限日です",
    },
  };

  // 複数の課題に対応
  for (let i = 0; i < json_rslt.length ; i++) {
    // コメントを登録したい課題を指定する
    issues_comments_url = "https://【サブドメイン】.backlog.com/api/v2/issues/" + json_rslt[i]["issueKey"] + "/comments?apiKey=【API Key】";

    // 課題にコメントを登録する。rsltは無くてもいい
    rslt = UrlFetchApp.fetch(issues_comments_url, parameter_post);
    
    // ログ出力用。無くてもいい
    console.log("期限日 " + today + " のタスク: " + json_rslt[i]["issueKey"]);
  }
}


課題の検索条件について

  • projectId
    • 複数のプロジェクトIDを指定できます
    • 複数の指定例(&は検索条件をorでつなぐイメージ)
      • projectId=100001&projectId=100002&projectId=100003
  • statusId
    • デフォルト設定の場合、1=未処理、2=処理中、3=処理済みです
    • 複数の指定例(&は検索条件をorでつなぐイメージ)
      • statusId=1&statusId=2&statusId=3
  • dueDateSince
    • 期限日の範囲(開始日)を指定する
  • dueDateUntil
    • 期限日の範囲(終了日)を指定する
    • dueDateUntil以前の課題をすべて検索したい場合は、dueDateSinceを指定しない


BacklogのAPI Key取得手順

API Keyを発行した、個人アカウント名でコメントが書かれます。そのため、あたかもその個人から言われたと感じる恐れがあり、人を連想しないアカウント(例えばシステム、またはチコちゃん)でAPI Keyの発行することをお勧めします。


Backlogのインテグレーション設定

下記を参考に設定します。SlackやTeamsなどがあります。


GoogleAppsScriptのトリガー実行設定

GUIでさっと時間や日、週指定などが設定でき、なんならログも保存されます。便利ですね。

[GitLab] GitLabのAPIを使って設定投入をコード化する

はじめに

GitLabの以下設定をAPIで実施していきます。

API Docs | GitLab

  • APIによる設定
    • ユーザの作成
    • グループのインポート
    • グループにユーザを追加
    • グループにプロジェクト(リポジトリ)をインポート
    • リポジトリにWebhookを登録


環境


設定の流れ

  1. インポートするグループ、プロジェクトを用意します。
    ・他のGitLabより、任意のグループとプロジェクトをエクスポートしておきます。
    ・エクスポートされないデータ(例えばトークン類)があるので確認が必要です。
    プロジェクトのインポート/エクスポート | GitLab
    グループのインポート/エクスポート | GitLab
  2. 構築したGitLabを取り出します。
    ・t3.medium(メモリ4GB)では、アクセストークン作成の応答が返ってくるまで時間がかかります。
    GitLab installation minimum requirements | GitLab
  3. rootアカウントのアクセストークンを作成します。
    ・以降の手順で、作成したアクセストークンを使います。
  4. ユーザを作成します。
  5. グループをインポートします。
  6. グループにユーザを追加します。
  7. グループにプロジェクトをインポートします。
  8. プロジェクトにWebhookを登録します。


APIによる設定

rootのアクセストークン作成

アクセストークンの作成はgitlab-rails consoleを利用します。
また、トークンには任意の文字列(20文字以上)が指定できます。

今回は1行で実施します。

# コマンド
$ sudo gitlab-rails runner "token = User.find_by_username('【トークンが紐づくアカウント】').personal_access_tokens.create(scopes: [【トークンの権限】], name: '【トークンの名前】'); token.set_token('【トークン】'); token.save"
# API権限を持つトークンの作成例
$ sudo gitlab-rails runner "token = User.find_by_username('root').personal_access_tokens.create(scopes: [:api], name: 'AutomationToken'); token.set_token('token-string-1234567'); token.save"
  • 参考
    • Personal access tokens | GitLab
    • ドキュメントには「token.save!」と「!」がついていますが、環境によってはエラーになります。
    • エラーメッセージ
      • bash: !": event not found
      • 「!」はRailsメソッドで、付けると例外を発生させます。付けない場合はnilが返ってきます。


ユーザの作成

なるべく少ない設定でユーザを作成します。

  • skip_confirmation
    • デフォルト: false
    • trueにすると、メールアドレスの確認を検証済みにします。
# コマンド
$ curl --request POST --header "PRIVATE-TOKEN:【トークン】" --form "email=【メールアドレス】" --form "name=【アカウント名】" --form "username=【ユーザ名(ログインID)】" --form "password=【パスワード】" "http://xx.xx.xx.xx/api/v4/users"
# ユーザの作成例
$ curl --request POST --header "PRIVATE-TOKEN:token-string-1234567" --form "email=automation@example.com" --form "name=automation" --form "username=automation" --form "password=password1234" --form "skip_confirmation=true" "http://localhost/api/v4/users"


グループのインポート

グループをインポートします。
グループ名は2バイト文字も設定できます。

# コマンド
$ curl --request POST --header "PRIVATE-TOKEN:【トークン】" --form "name=【グループ名】" --form "path=【グループのURL】" --form "file=@./【ファイルパス/ファイル名】" "http://xx.xx.xx.xx/api/v4/groups/import"
# グループのインポート例
$ curl --request POST --header "PRIVATE-TOKEN:token-string-1234567" --form "name=test-group" --form "path=test-group" --form "file=@./test-group_export.tar.gz" "http://localhost/api/v4/groups/import"


グループへのユーザ追加

追加したいユーザのIDを調べ、そのIDを使ってグループにユーザを追加します。
また、グループに対するユーザのアクセス権限は以下が指定できます。

Group and project members API | GitLab

  • アクセス権限
    • No access (0)
    • Minimal access (5) (Introduced in GitLab 13.5.)
    • Guest (10)
    • Reporter (20)
    • Developer (30)
    • Maintainer (40)
    • Owner (50) - Only valid to set for groups
# コマンド
$ 【ユーザID】=`curl --request GET --header "PRIVATE-TOKEN:【トークン】" "http://xx.xx.xx.xx/api/v4/users?username=【ユーザ名】" | jq -r '.[].id'`
$ curl --request POST --header "PRIVATE-TOKEN:【トークン】" --data "user_id=【ユーザID】" --data "access_level=【アクセス権限】" "http://xx.xx.xx.xx/api/v4/groups/【グループのURL】/members"
# グループへのユーザ追加例
$ ID=`curl --request GET --header "PRIVATE-TOKEN:token-string-1234567" "http://localhost/api/v4/users?username=automation" | jq -r '.[].id'`
$ curl --request POST --header "PRIVATE-TOKEN:token-string-1234567" --data "user_id=${ID}" --data "access_level=20" "http://localhost/api/v4/groups/test-group/members"


グループへのプロジェクトインポート

作成したグループに、プロジェクトをインポートします。

# コマンド
$ curl --request POST --header "PRIVATE-TOKEN:【トークン】" --form "namespace=【グループのURL】" --form "path=【プロジェクトのURL】" --form "file=@./【ファイル名】" "http://xx.xx.xx.xx/api/v4/projects/import"
# グループへのプロジェクトインポート例
$ curl --request POST --header "PRIVATE-TOKEN:token-string-1234567" --form "namespace=test-group" --form "path=demo" --form "file=@./test-group_demo_export.tar.gz" "http://localhost/api/v4/projects/import"


リポジトリへのWebhook登録

リポジトリに、Webhookを登録します。 POST先URLのグループとプロジェクトの間の「/」は、「%2F」に置き換えます。

API Docs | GitLab

  • enable_ssl_verification
    • デフォルト:true
    • falseを指定することで、SSL検証を無効にできます。
# コマンド
$ curl --request POST --header "PRIVATE-TOKEN:【トークン】" --form "id=【リポジトリ名】" --form "url=【通知先のURL】" --form "push_events=true" --form "token=【通知先のトークン】" --form "enable_ssl_verification=false" "http://xx.xx.xx.xx/api/v4/projects/【グループ名】%2F【プロジェクト名】/hooks"
# JrenkinsのWebhook登録例
$ curl --request POST --header "PRIVATE-TOKEN:token-string-1234567" --form "id=test-group" --form "url=https://jenkins.XXX/project/XXX" --form "push_events=true" --form "token=XXX" --form "enable_ssl_verification=false" "http://localhost/api/v4/projects/test-group%2Fdemo/hooks"

[Veracode] JenkinsのパイプラインでVeracodeのアプリケーション診断を実行する

はじめに

JAVAアプリをビルドし、JenkinsのパイプラインでVeracodeのアプリケーション診断を実行してみます。
なお、フリースタイルプロジェクトではなく、パイプラインで実装します。


環境


事前準備

  • Veracode Platformで実施すること
    • API IDとSecretKeyを作成する
    • JARファイルのアップロード先となるアプリケーション(ガワみたいなもの)を追加する
      • アプリケーションの検査ポリシーのレベルや、Sandboxの使用可否を設定する
  • Jenkinsで実施すること
    • Veracode Scanプラグインを導入する
    • Jenkinsの認証情報にAPI IDとSecretKeyを登録する
      • 認証情報の種類はユーザ名とパスワードとする


Jenkinsパイプラインの設定

  • なるべく少ないオプションで実現しています
    • Jenkinsパイプライン内で、 Veracode Platformにアプリケーション(ガワみたいなもの)を追加したり、Sandboxを設定する事もできます
stage('VeracodePipelineスキャン') {
    steps {
        withCredentials([
            usernamePassword (
                // 認証情報をIDとSecretKeyに分割します
                credentialsId: '【認証情報のID】',
                usernameVariable: 'VERACODE_API_ID',
                passwordVariable: 'VERACODE_API_KEY'
            )
        ]) {
            veracode applicationName: '【アプリケーション名】',
            // コンソールにデバッグ情報を表示します
            debug: true,
            sandboxName: '【サンドボックス名】',
            // scanNameがスキャン結果の名前になります。毎回変わる値が含まれていると良いです
            scanName: "${BUILD_TAG}",
            // Scanの待ち時間(分) 
            timeout: 60, 
            // ワークスペースのルートディレクトリが基準のようです
            uploadIncludesPattern: '**/【ファイル名】.jar',
            vid: "${VERACODE_API_ID}",
            vkey: "${VERACODE_API_KEY}",
            // スキャンが終わるまで待ちます。また、スキャン結果がJenkinsパイプラインの結果に表示されます
            // trueを指定しない場合、Veracodeにアプリケーションのアップロードとスキャン指示を出して、次の処理に進みます。スキャン結果は、Veracode Plaformでの確認になります
            waitForScan: true
        }
    }
}


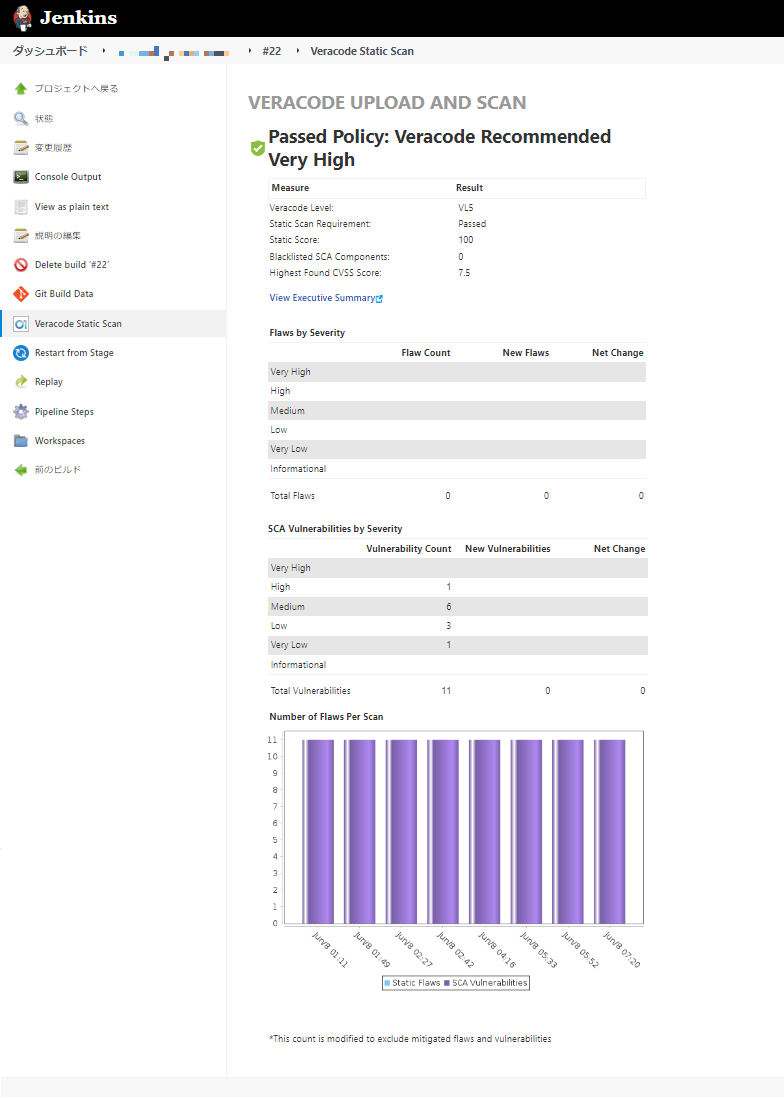
パイプラインの実行結果

  • スキャン結果
    • 6段階のSeverityで表示されます。


  • ログ
[Pipeline] withCredentials
Masking supported pattern matches of $VERACODE_API_ID or $VERACODE_API_KEY
[Pipeline] {
[Pipeline] veracode
Warning: A secret was passed to "veracode" using Groovy String interpolation, which is insecure.
         Affected argument(s) used the following variable(s): [VERACODE_API_KEY, VERACODE_API_ID]
         See https://jenkins.io/redirect/groovy-string-interpolation for details.
------------------------------------------------------------------------
Upload and Scan with Veracode Pipeline
------------------------------------------------------------------------

[Debug mode is on]

Can Fail Job: false

Timeout: 60

Version information:
VeracodeJavaAPI v22.1.9.3 cUnknown

HPI location: 
var/lib/jenkins/plugins/veracode-scan/WEB-INF/lib/veracode-scan.jar

Processing files in [remote] workspace: 
/var/jenkins/workspace/xxx

Performing scan from [remote] workspace?
true

Invoking the following command in remote workspace:
[xxx] $ java -jar /var/jenkins/veracode-scan/VeracodeJavaAPI.jar -action UploadAndScan -vid **** -vkey ******** -scantimeout 60 -appname 【アプリケーション名】 -createprofile false -sandboxname "Development Sandbox" -createsandbox false -version jenkins-xxx-22 -autoscan true -maxretrycount 5 -debug -filepath /var/jenkins/workspace/xxx.jar -useragent "VeracodeScanJenkins/22.5.17.2 (Jenkins/2.332.2; Java/Unknown)"
[2022.06.08 07:21:17.069] VeracodeJavaAPI v22.1.9.3 c17.0.3
[2022.06.08 07:21:17.070] Wrapper action: UploadAndScan
()
[2022.06.08 07:41:55.212] Requesting analysis info again in 60 seconds.
[2022.06.08 07:43:55.214] 
[2022.06.08 07:43:55.214] The status of the new analysis is "Results Ready".
[2022.06.08 07:43:55.216] Invoking API https://analysiscenter.veracode.com/api/4.0/summaryreport.do
[2022.06.08 07:43:55.216] Query string: build_id=xxx
[2022.06.08 07:43:55.216] Connecting to host: analysiscenter.veracode.com
[2022.06.08 07:43:55.322] Writing to request output stream
[2022.06.08 07:43:55.322] Close request output stream
[2022.06.08 07:43:55.322] Getting response status code from HTTP response message
[2022.06.08 07:44:08.371] Server returned HTTP response code: 200
[2022.06.08 07:44:08.371] Retry is not required
[2022.06.08 07:44:08.371] Connecting to response input stream
[2022.06.08 07:44:08.371] Reading response input stream
[2022.06.08 07:44:08.391] Close response input stream
[2022.06.08 07:44:08.604] 
[2022.06.08 07:44:08.604] The scan finished with policy status 'Pass'.
[2022.06.08 07:44:08.609] Wrapper return code 0 = Success
[Pipeline] }
[Pipeline] // withCredentials
[Pipeline] }


参考

診断時間は早いのか遅いのか他と比較してないから分からないけど、JARファイル80MBで平均20分(試行回数10回)くらいでした。